Introduction Configuring the Macintosh for the Internet is for the most part a very simple endeavour, as with anything Macintosh. Its the intuitiveness of the Operating System that keeps us using the Mac. The most difficult part about setting up a Mac for the Internet is determining which dialer, and which Networking control panel you are using. There are 3 PPP dialers for the Mac in popular usage, and 2 Network control panels. The dialers are, ConfigPPP, Free PPP, and PPP which ships with the latest releases of the Mac Os. As well the two networking control panels in use are MacTCP, or Classical Networking, used in older 68k Macs, and Open Transport, or TCP/IP which is used in today's Power Macintosh's. The following instructions will help you first determine what Internet software you have on your machine, and then give you appropriate information for its configuration. The first thing you will need to do is determine what Internet software you have. This is done by seeing what dialers are available in the networking control panel. Once you have determined this you will need to record it, and follow the instructions for this particular dialer. These instructions are for use with both SEI Data, and the Venus Net services. Which service you signed up with will be determined by where you will be calling from. On signup you will be told which service you will be using. This can also be easily determined by refering to your email address, if it is in the form of username@seidata.com, then you are a SEI Data user, otherwise it would be username@venus.net, and you would want to enter in the information below for Venus Net. Both SEI Data and Venus Net will strive to provide the greatest service possible. Determining Your Internet Software
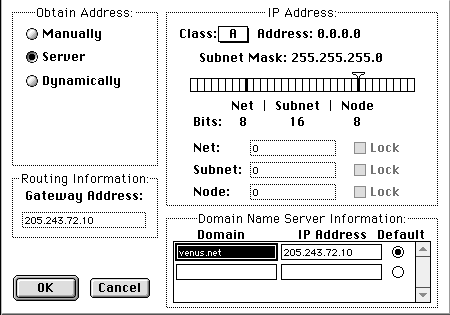
On the upper right you'll have Class, it should be set to either Class A or C. Below this is the Subnet Mask, it should be set to 255.255.255.0, if it isn't you'll need to change the number. Below the Subnet Mask you have a ruler, and directly above it you have a triangle. Click on this triangle and drag it to he right. Drag it till you get the correct number (listed above). Towards the bottom of the screen you have the Domain, the domain should be seidata.com (or if using Venus Net, venus.net should be used), directly to the right is the IP, the IP for SEI Data is 208.10.211.2 (for Venus Net you would use 205.243.72.10). And to the right of the IP is a Default radio button, this button should be selected. Below this you should have two empty boxes. TCP/IP (if you have MacTCP, skip ahead to the next paragraph)
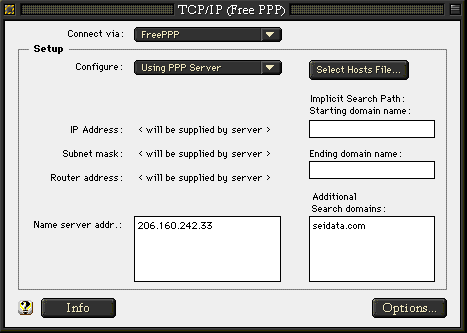
Open Free PPP Setup, you should see a few tabs at the bottom, as in General, Accounts, etc. If these tabs are not listed you'll need to click the triangle in the bottom left of the FreePPP Setup window. This will then show you these other options. Click the Accounts tab. Then click edit on the right hand side of Accounts. This will open a window with account information. The server should be SEI Data (or Venus.net if appropriate), the phone number contains the local dialup number. Dial Area code and Dial as Long Distance should not be checked. Connect should be set to Directly. Finally you should enter in your username and password. Click OK at the bottom (if it prompts you and asks if you don't want to dial an area code click yes). Close the Free PPP window, and restart the Macintosh. You are now configured for the Internet.
When you get back to the Desktop open Free PPP Setup. Click Connect and the modem will begin to dial. Once you are connected and the counter begins to count the time you are online, you are ready to open up your Internet Application (Netscape, Eudora, etc.). When you are done with the Internet go back to Free PPP Setup and click Disconnect.
ConfigPPP
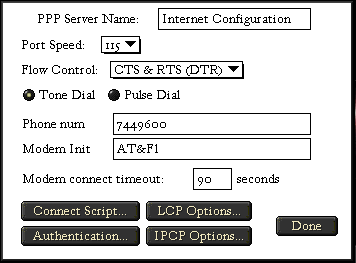
Next click the Connect Script at the bottom of the window. Set all the radio buttons to Out, delete all the text from the script lines, uncheck all CR. Click OK. Now click on Authentication, here enter your logon username and password on the lines provided. Click on OK. Click on LCP Options, click Default Settings, and then click OK. Click IPCP Options, click Default Settings, and then click OK. Click on Done. Close the ConfigPPP window in the upper right hand corner. You will now need to restart the Macintosh, and when you return to the Desktop, launch Config PPP and click Open. This will dial your modem, and attempt to log you onto the Internet. If you are successful your Config PPP dialer will change from PPP Down to PPP Up. You can now open your Internet software, and should be able to start surfing, and getting email. If you encounter problems: Double Click your Hard Drive icon, then double click on your System folder, next double click your Exstensions Folder. Find the MacPPP or PPP icon. Select the icon. Go under the file menu and select Get Info. On the version line it must indicate v.2.5.3 or greater. If not, that is the problem. You will need to obtain a replacement copy of the correct version or get FreePPP. Versions prior to v2.5.3 are not compatible. If you need to obtain a newer version of ConfigPPP (which you will if your version is older than v2.5.3), you can pick up a copy at our office on a floppy disk, or call us and we will mail it to you (which will include a shipping and handling charge). This offer is only valid till 11:59 p.m. EST, January 31, 1998. If version is 2.5.3 or greater and you still encounter problems, then:
Close all open windows, double click on your Hard Drive icon. Next double click on your System Folder, and finally double click on the Preferences folder. Delete the file named PPP Preferences. Restart the Machine. After the startup sound, hold down the Option and the Command keys to rebuild the desktop. You will now have to resetup the ConfigPPP Control Panel. Then restart the machine again. ConfigPPP should now work correctly.
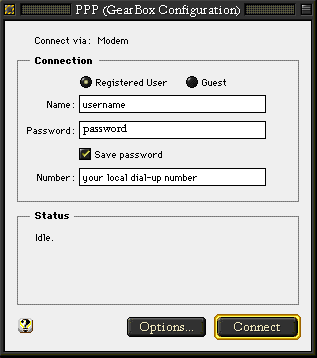
PPP
You will now need to restart the Macintosh, and when you return to the Desktop, launch PPP and click Connect. This will dial your modem, and attempt to log you onto the Internet. If you are successful your PPP dialer will change from Idle, to showing network activity (sending and receiving data, which confirms your connection). You can now open your Internet software, and should be able to start surfing, and getting email.
If you have any difficulty getting on the Internet after following these instructions, then you can contact Technical Support for assistance. You can reach us at 667-8800, 873-8800, 744-8800, or 839-8800. If you have email access, send email to support@seidata.com.
|